













Latvia DIY: Avoid 6 Bathroom Waterproofing Failures, Finish in 3–5 Days
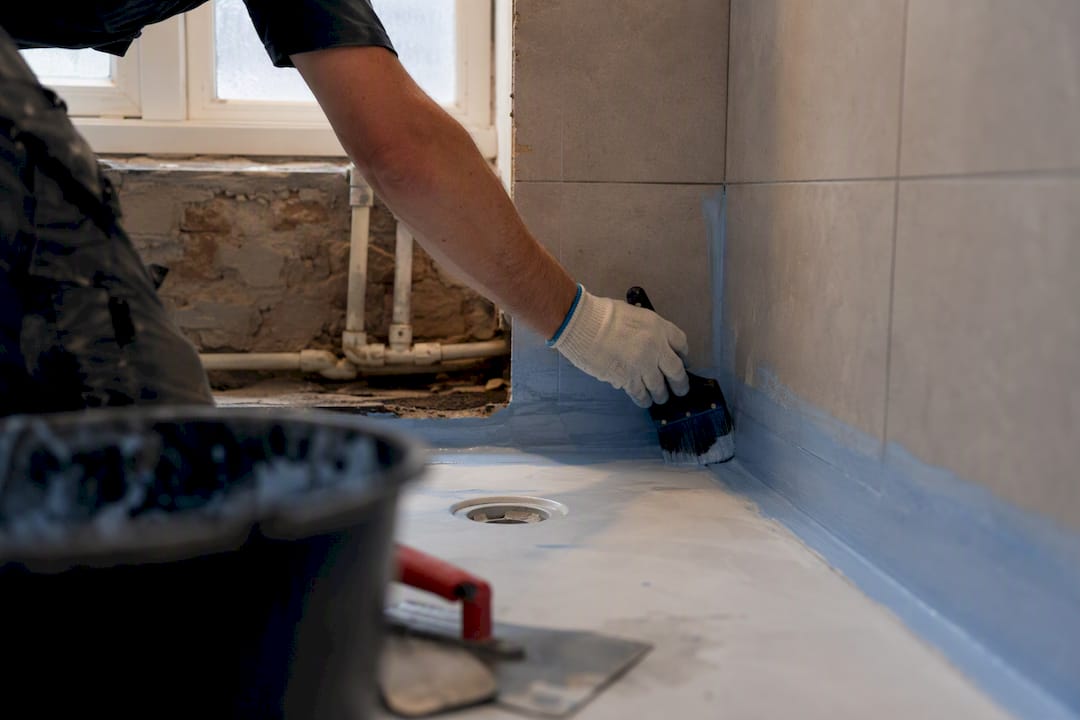
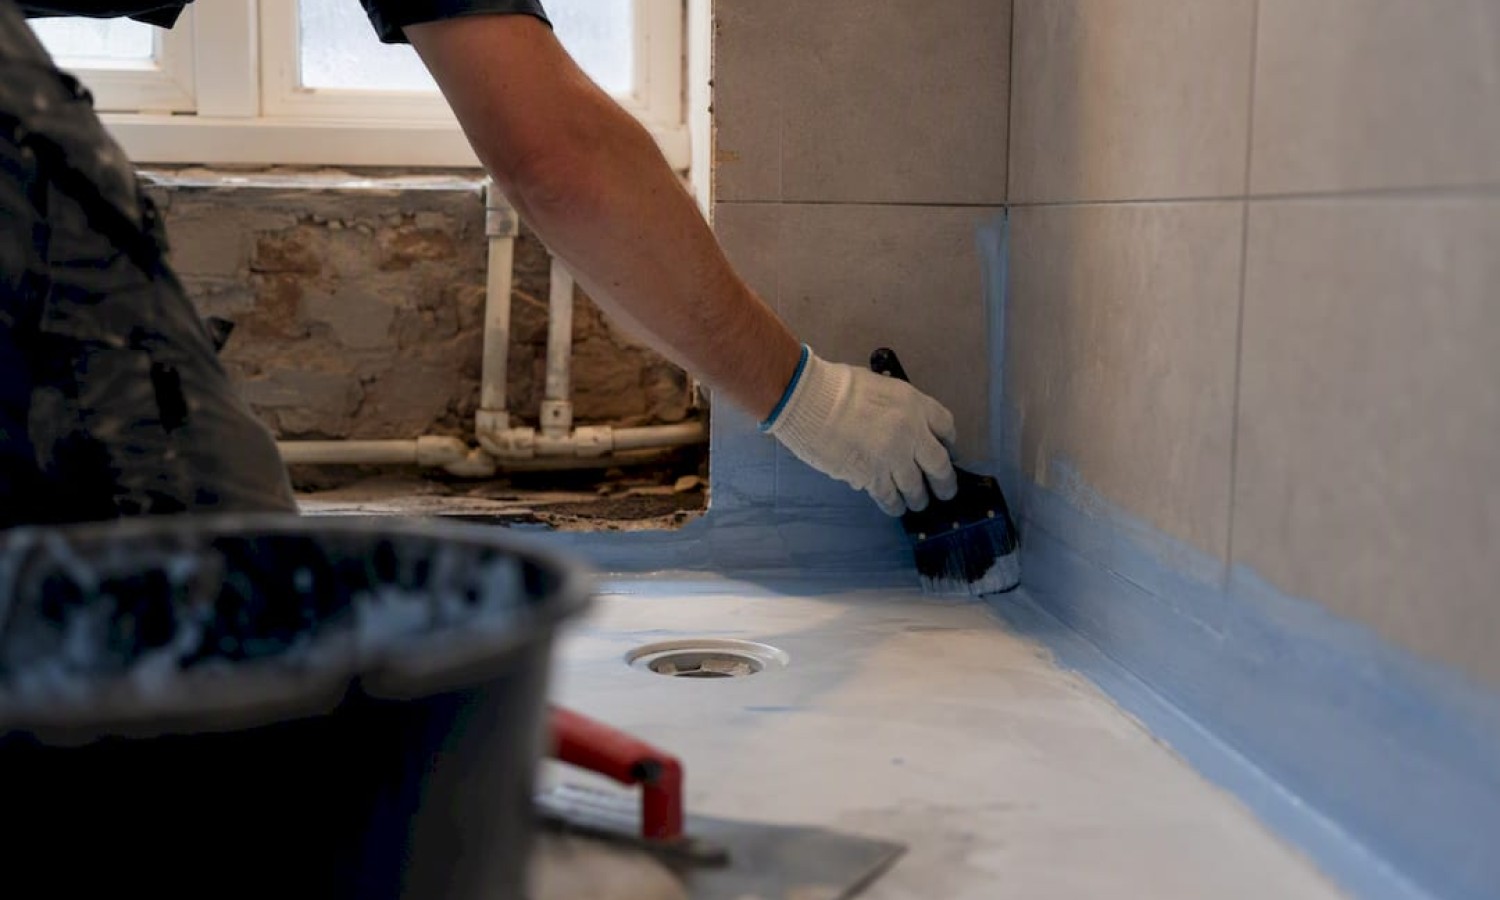
The correct approach is a continuous liquid waterproofing membrane applied over a clean, primed substrate, with taped and reinforced seams, corners, and drain penetrations, and full slope toward the drain. Before buying anything, inspect the substrate for cracks or soft spots, then order primer and membrane in matching quantities from one product system. If the floor or walls show structural damage, call a contractor before you touch a roller.
TL;DR:
- Proper waterproofing requires careful substrate preparation, including cleaning, patching cracks, and ensuring a full slope toward the drain before membrane application.
- Skipping reinforcement at corners, penetrations, and stopping the membrane too low are common causes of failure, which can lead to hidden leaks and structural damage over time.
- Liquid membranes and reinforcement fabrics are recommended materials for residential bathrooms, with primer choice depending on substrate and product compatibility.
- The waterproofing process typically takes three to five days, emphasizing the importance of adequate curing time and avoiding rushed applications to prevent defects.
- Regular post-installation maintenance, like regrouting cracks and inspecting seams, enhances membrane longevity and prevents early failures.
Table of Contents
- Why Bathroom Waterproofing in the Shower and Wet Zone Matters
- What Mistakes Cause Most Waterproofing Failures?
- Which Waterproofing Materials Should You Use?
- How Do You Waterproof a Bathroom Step by Step?
- Getting Drains, Corners, and Pipe Penetrations Right
- When Should You Hire a Waterproofing Professional?
- Manufacturer Data and Where to Find Compatible Materials
- How Long Does the Whole Waterproofing Process Actually Take?
- How Do You Maintain Waterproofing After It’s Installed?
- A Quick Checklist Before You Start
- Where to Buy Waterproofing Materials for Your Bathroom
- Sources
Why Bathroom Waterproofing in the Shower and Wet Zone Matters
Tile grout looks solid, but it’s porous. Water works through joints and reaches the substrate underneath the tile whether the grout is fresh or years old. Once moisture sits against concrete or screed, it doesn’t evaporate quickly in an enclosed bathroom, and that’s how rot, mold, and swollen door frames start, sometimes in the apartment below yours.
A hidden leak rarely announces itself until the damage is expensive. By the time paint bubbles on a ceiling or a wood floor board cups, water has usually been traveling through the structure for months.
That’s why manufacturers across the industry treat membranes as baseline construction practice, not an upgrade:
- Grout and adhesive alone never form a hermetic barrier.
- Concrete, screed, and gypsum board all absorb and hold water without a membrane.
- Leaks below floor level often damage neighboring units, triggering costly insurance claims.
- A membrane failure usually isn’t visible until tiles are already removed.
Skipping this step to save a weekend of work is the single most expensive mistake in a bathroom renovation.
What Mistakes Cause Most Waterproofing Failures?
Almost every leak traced back to a bathroom renovation shares the same handful of root causes. Recognizing them lets you inspect your own work, or a contractor’s, before tiles go down and the evidence disappears.
- Skipping proper substrate cleaning. Dust, loose particles, and old adhesive residue block the membrane from bonding, and cracks or weak screed left unrepaired will telegraph straight through the coating.
- Using no primer, or the wrong one. Different substrates absorb differently; a primer matched to concrete won’t behave the same on gypsum board.
- Applying too thin a coat. Membranes are rated in kilograms per square meter for a reason. A rushed, thin pass leaves pinholes.
- Skipping reinforcement at corners, pipe penetrations, and drains. These are the points under the most movement stress, and they fail first.
- Stopping the membrane too low on the wall. Splash zones need coverage well above where most DIYers assume it should stop.
- Tiling before the membrane has fully cured. Trapped moisture under an adhesive bed leads to bond failure and mold you won’t see until the tiles are removed.
Pro Tip: Photograph every stage before it’s covered, prep, primer, first coat, reinforcement, second coat. If a leak shows up in a year, that record is the only way to prove where the failure happened.
Which Waterproofing Materials Should You Use?
Liquid membranes dominate residential bathroom work because they conform to irregular shapes, corners, and pipe penetrations without cutting and seaming a sheet. Two-component cement-polymer systems tend to bridge cracks better on shifting substrates, while one-component liquid products cure faster and suit straightforward concrete or screed floors.
- Liquid membranes, like Ceresit CL 51, a quick-drying dispersive coating designed for interior wet zones.
- Reinforcement fabric or tape, embedded into corners, wall-to-floor joints, and around pipes, plus preformed corner pieces and butyl collars where drains pass through the slab.
- Two-component systems, such as Sikalastic®-685, which offers a reinforcement layer option for floors with higher crack-bridging demands.
- System-matched primers, since Kiilto’s guidance on choosing between Fibergum, Keramix, and KeraSafe shows drying times and substrate suitability vary by product line, not just by brand.
Substrate compatibility isn’t optional. A product engineered for concrete can crack on untreated wood without the right primer and a separation layer, so check the technical data sheet before you buy. As a real-world reference point, SAKRET OAD ELASTIC covers a floor at roughly 1.3 kg/m² per coat, a figure worth knowing before you calculate how many buckets to order.
How Do You Waterproof a Bathroom Step by Step?
The sequence matters as much as the materials. Skip a step and every coat applied after it inherits the flaw.
- Prep the substrate. Remove loose material, grind high spots, and patch cracks or soft screed. Confirm the floor is structurally sound before anything else happens.
- Check the slope. Water needs a consistent fall toward the drain, typically a couple of percent grade, with no flat spots or reverse pitch where puddles can sit.
- Apply primer matched to your substrate and product line, then wait the manufacturer’s stated time. Kiilto’s systems, for example, specify different drying windows depending on which membrane follows.
- Apply the first coat, embedding fabric or tape reinforcement into corners, wall-floor joints, and around every pipe penetration while the coat is still wet.
- Let it dry for the time stated on the technical data sheet, usually several hours, sometimes overnight.
- Apply the second coat at 90 degrees to the first pass. Crossing direction closes any pinholes the first coat missed and evens out film thickness.
- Inspect and test. A visual check for pinholes plus a simple ponding test on the floor (fill with a shallow layer of water, mark the level, check it after a set time) tells you whether the membrane holds before tile goes down.
- Tile only after full cure, using an adhesive the manufacturer approves for application directly over the membrane.
Pro Tip: Don’t trust “touch dry” as your cue to tile. Cure times on the data sheet assume standard room temperature and humidity; a cold, damp bathroom in winter can double them.
Getting Drains, Corners, and Pipe Penetrations Right
These small details cause more callbacks than flat-surface coverage ever does, because they’re where the membrane has to bend, wrap, or seal against a rigid fitting instead of lying flat.
- Drains need a purpose-made collar or butyl tape that bonds mechanically to the drain body, not just a smear of membrane over the gap.
- Pipe penetrations call for flexible manšettes and a sealant compatible with your specific membrane, since incompatible sealants can lift or discolor the coating.
- Corners should get either a preformed corner piece or fabric reinforcement pressed into the wet first coat, then sealed under the second.
- Wall height in the wet zone should extend well above shower head height, not just to tile line, since Ceresit’s product documentation treats splash exposure as a full-height concern, not a floor-only one.
- Level checks before membrane application prevent the low spots that turn into standing puddles nobody notices until the grout stains.
If you’re coordinating this with new pipe runs, a practical plumbing installation guide is worth reading before you cut into the floor.
When Should You Hire a Waterproofing Professional?
DIY works fine for a straightforward floor and shower wall on sound concrete or screed. Call a professional when the substrate is compromised, when underfloor heating is embedded in the slab, when you’re dealing with a multi-apartment connector wall, or when you genuinely can’t get the floor to fall correctly toward the drain.
Before hiring anyone, ask for:
- The exact product technical data sheets they plan to use.
- Number of coats and total target film thickness.
- A written warranty covering the waterproofing work specifically.
- Photo documentation of prep, primer, and each coat before tiling covers it.
- References from a comparable bathroom job, not just a kitchen backsplash.
Walk away from any quote that skips a primer step, mentions only a single coat, says nothing about joint or corner detailing, or gives you a vague answer on curing time. A regulations overview for builders is a useful reference if you want to check what documentation a contractor is legally expected to provide.
Manufacturer Data and Where to Find Compatible Materials
Getting quantities right starts with the coverage rate on the bag or bucket. SAKRET OAD ELASTIC runs about 1.3 kg/m² per coat on a floor; multiply that by your area and by two coats, then add extra for corners and repairs.
Quantify material needs by multiplying floor area by the coverage rate per coat, then by the number of coats, and add 7 to 10 percent extra for detailing waste and touch-ups. Running short mid-application forces you to mix a new batch that may not match the cure profile of what’s already on the wall.
A few compatibility rules worth repeating before you order:
- Never apply a concrete-formulated membrane directly onto untreated wood without the manufacturer’s recommended primer and separation layer.
- Match primer, membrane, tape, and adhesive from one product line where possible to avoid chemical incompatibility.
- Confirm drying and cure times against the season. Winter renovations in an unheated space run slower than the data sheet’s baseline.
Santehnikasveikals stocks primers, membranes, sealing tapes, and drain collars for exactly this kind of job, with technical support available if you’re unsure which system fits your substrate.
How Long Does the Whole Waterproofing Process Actually Take?
Budget more time than you think, especially on cure windows you can’t rush. A typical bathroom floor and wet-zone wall, done by one person working evenings and weekends, breaks down roughly like this.
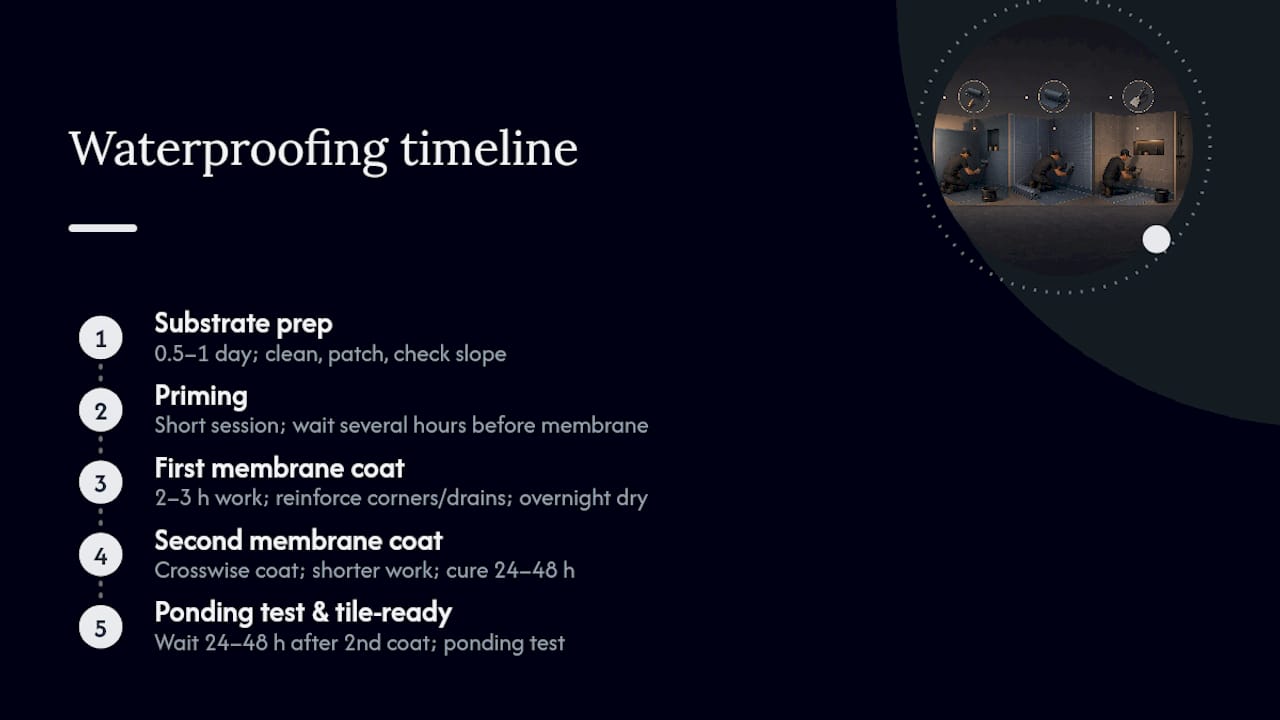
Substrate prep, cleaning, patching cracks, checking slope, usually takes half a day to a full day depending on how much repair the screed needs. Priming adds another short session, but then you wait: most primers need several hours before the membrane goes on, and rushing this step is one of the more common ways a coat fails to bond properly.
The first membrane coat with reinforcement embedded at corners and drains takes two to three hours of actual work for an average bathroom, followed by a drying period that’s almost always overnight. The second coat, applied at 90 degrees to the first, takes less time since you’re covering ground you already know, but it needs its own full cure before you touch it.
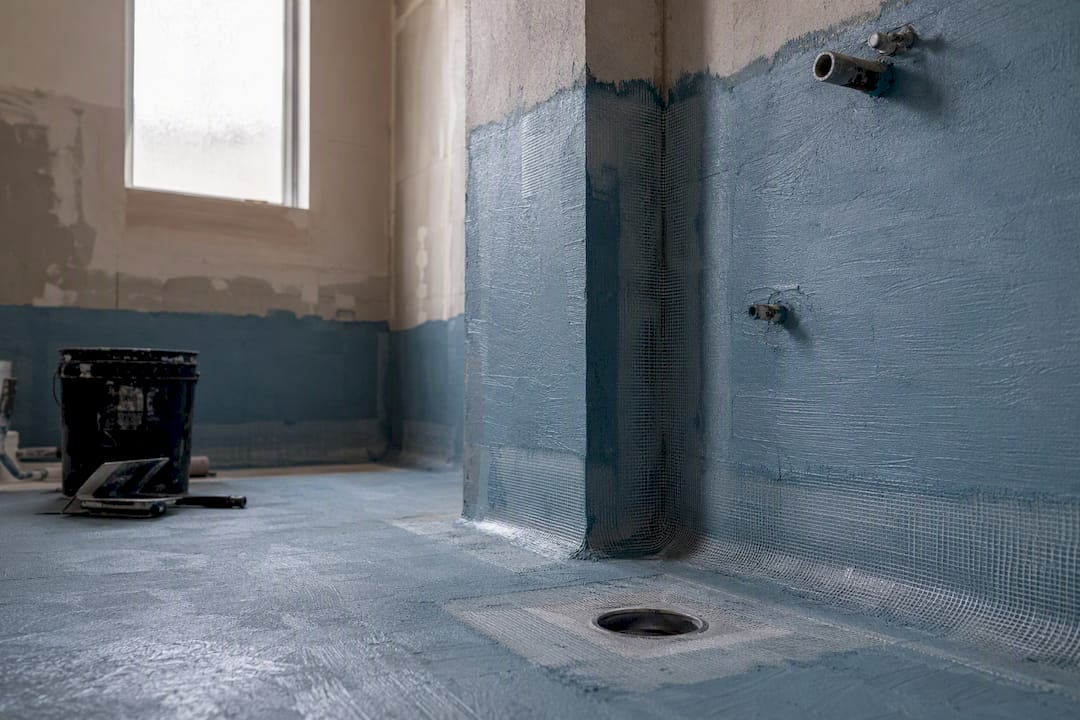
After the second coat, plan on waiting at least 24 to 48 hours, sometimes longer in cold or humid conditions, before running a ponding test and moving on to tile adhesive. Add it up and a realistic total, from first grinder pass to tile-ready substrate, lands somewhere between three and five days for most residential bathrooms. Rushing that timeline is exactly how pinholes and incomplete cures slip through.
How Do You Maintain Waterproofing After It’s Installed?
A properly installed membrane is built to last the life of the bathroom, but a few habits protect it from premature failure, particularly at the seams and penetrations you can’t see once tile goes down.
Regrout hairline cracks in tile joints as soon as you spot them. Grout isn’t the waterproofing layer, but a cracked joint lets more water reach the membrane and its seals faster than the system was designed to handle. Check silicone sealant around the tub, shower tray, and any fixed glass panel once a year. Silicone degrades and shrinks over time, and a gap there sends water straight down to the membrane’s weakest point, the wall-to-floor transition.
Avoid drilling into tiled walls in the wet zone without knowing exactly where your membrane and any hidden pipes sit. A screw through the membrane creates a puncture no amount of grout will fix. If you ever notice discoloration at a grout line that won’t clean off, or a slight softness underfoot near the drain, investigate immediately rather than waiting; those are the earliest visible signs of a membrane breach, and catching one early is far cheaper than replacing a floor.
Keep the drain clear of hair and debris so water never sits longer than it should on the membrane surface, even a properly sloped floor benefits from good drainage habits.
A Quick Checklist Before You Start
Follow the technical data sheet for whatever product you buy. Manufacturer instructions exist because lab-tested drying times, coverage rates, and substrate rules are specific to that formula, and guessing is how failures happen.
Before you open a bucket, run through this:
- Substrate inspected, cracks repaired, surface clean and dry
- Correct primer purchased for your specific substrate
- Slope toward drain confirmed with a level
- Reinforcement tape or fabric on hand for corners and penetrations
- Enough membrane ordered, calculated by area times coats, plus 10 percent extra
- Cure time scheduled realistically, not optimistically
- Ponding test planned before tiling begins
Buy slightly more membrane than your calculation suggests. Running out halfway through a coat, waiting on a new order, and resuming with a partially cured edge is a bigger risk than a little leftover product.
— Renate
Where to Buy Waterproofing Materials for Your Bathroom
Once you know your substrate and quantities, sourcing compatible primer, membrane, tape, and drain collars from one supplier saves you the guesswork of matching brands yourself. Santehnikasveikals carries the waterproofing consumables covered in this guide alongside the fixtures that go in after the membrane cures.
If your renovation includes a new drain connection, the VIEGA WC pieslēgs 400mm and VIEGA WC pieslēgs 250mm options cover the two most common connector lengths homeowners need when tying a new WC into an existing waterproofed floor. Planning further ahead to the bath itself, the Vanna Paa VARIO M stone-mass tub is worth browsing while your membrane cures, so you’re not choosing fixtures under time pressure once tiling starts.
Contact Santehnikasveikals’s technical support team before you order if you’re unsure which primer matches your screed or whether your drain needs a specific collar size. Getting that answer before checkout is faster, and cheaper, than returning the wrong kit after tiling has already begun.
Sources
- Kiilto Latvia — choosing the right waterproofing system
- Ceresit — Hidroizolēšana zem flīzēm
- Sikalastic®-685 | Sika Latvia
Atstājiet komentāru