









































Types of Shower Trays: A Complete Buying Guide

Shower trays fall into three primary categories: shape (square, rectangular, quadrant, offset/pentagon/D-shape), material (acrylic, stone resin/solid-surface, ceramic/enamel steel), and profile/height (low-profile at a shallow height above the finished floor, standard/raised with riser kits, and level-access/flush). For a small ensuite, a quadrant slimline tray saves floor space. For a bath-to-shower conversion, look for a rectangular tray sized to align with the existing waste position. For an accessible or wet-room build, a level-access stone-resin tray is the most practical choice.
Quick-reference by priority:
- Accessibility first: Level-access or low-profile tray, flush to floor, stone resin or solid-surface material
- Budget first: Acrylic or fiberglass, standard raised profile with riser kit, square or rectangular shape
- Luxury finish first: Stone resin or solid-surface, slate-effect texture, large rectangular or walk-in format
Table of Contents
- What shower tray shapes work best for your bathroom layout?
- Standard sizes and how to measure before you order
- Shower tray materials: how they compare on durability, feel, and cost
- How tray profile and height affect accessibility and plumbing
- Drain position, slope, and waterproofing: what to check before buying
- Installation basics, timeline, and routine maintenance
- How to choose the right shower tray: a decision matrix
- Ceramic vs. stone resin: which material actually holds up?
- Key Takeaways
- The detail most buyers overlook
- Santehnikasveikals: trays, enclosures, and accessories in one place
- Useful technical sources
What shower tray shapes work best for your bathroom layout?
Shape is the first decision, because it determines whether the tray fits the space at all. Common shapes include square, rectangular, quadrant, offset quadrant, D-shape, and pentagon/neo-angle options.
Square trays (typically 700×700 mm up to 1000×1000 mm) suit corner installations in compact bathrooms. They pair well with bi-fold doors, which require minimal swing clearance. Rectangular trays offer the largest usable showering area for the floor footprint and work in alcove layouts or open walk-in configurations. Sizes range from around 1000×760 mm up to 1700×900 mm, making them the most flexible shape for larger family bathrooms.
Quadrant trays have a curved front edge and fit neatly into a corner, saving floor space while still feeling open. They pair with sliding or hinged curved enclosure doors and are a standard choice for small en suites and cloakrooms. Offset quadrant trays are an asymmetric version of the same concept, giving more showering depth on one side without taking more floor space overall.
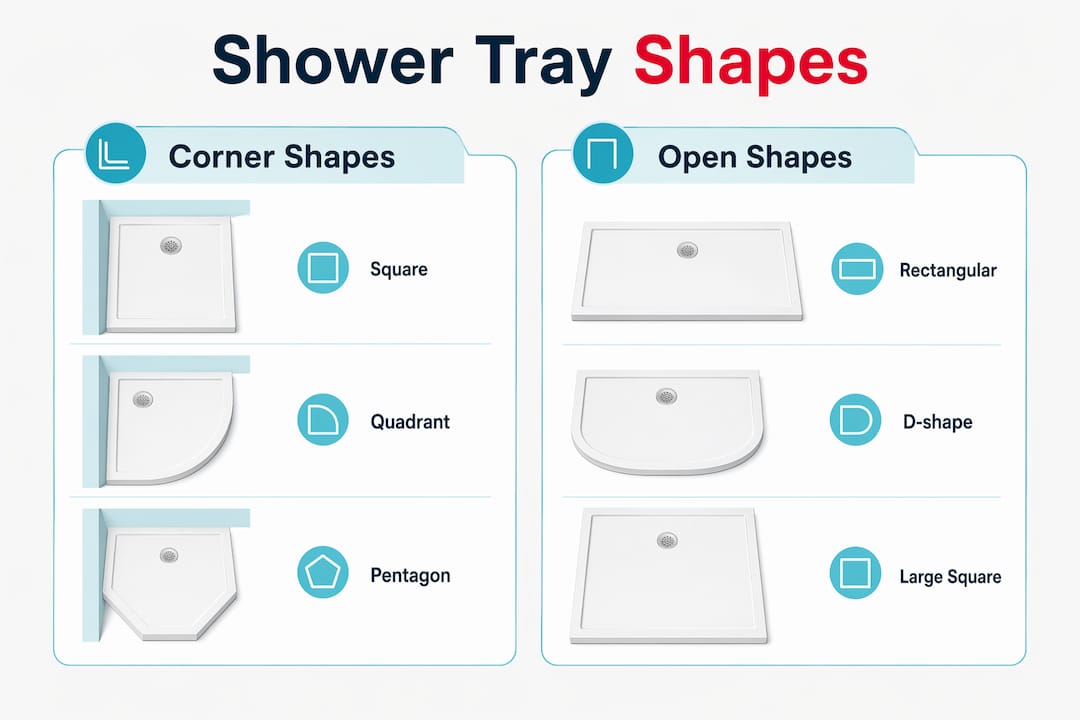
Pentagon and D-shape trays fit into corners with a five-sided or flat-front profile. Pentagon trays typically pair with bi-fold or pivot doors. D-shape trays have a straight back and curved front, useful when one wall is shorter than the other. Both handle asymmetrical layouts that a standard square or quadrant cannot accommodate cleanly.
For frameless glass enclosures, rectangular and large square trays are the most compatible because frameless panels need a flat, straight edge to seal against. Sliding door enclosures work with rectangular or offset quadrant trays. If no standard shape fits the space, a tiled wet-room floor or a custom-cut tray is the practical alternative.
Standard sizes and how to measure before you order
Buying the wrong size is one of the most common renovation mistakes. Measure carefully before ordering.
- Measure the finished floor area. Record length and width from finished wall surface to finished wall surface, not from stud or tile backer. Account for any planned tile thickness if walls are not yet tiled.
- Check the diagonal. In corner installations, measure both diagonals to confirm the corner is square. A corner that is out of square by more than a few millimeters will create gaps at the tray edge.
- Locate the existing drain center. Measure from the drain center to each adjacent wall. This tells you which drain-position option (center, offset, or corner) you need on the new tray.
- Record the drain offset. Note how far the drain sits from the wall, not just which wall it is closest to. Tray manufacturers specify drain position as a measurement from the tray edge, and a mismatch here forces subfloor work.
- Check enclosure door swing and track width. Sliding door tracks add 20–30 mm to the enclosure footprint. Bi-fold doors need clearance in front of the tray. Confirm the door swing does not conflict with the tray upstand or adjacent fixtures.
- Allow for wall tolerance. Walls are rarely perfectly plumb. A 5–10 mm tolerance on each side is standard. If walls are significantly out of plumb, factor that into the tray size or plan for a scribing strip.
Common standard sizes include several typical square and rectangular dimensions suitable for most bathrooms. For a bath-to-shower conversion, trays designed to align with standard bath waste positions simplify the project considerably.
Lead times: Off-the-shelf trays in standard sizes are typically available within a few days. Made-to-measure or custom-cut trays can take two to six weeks depending on the manufacturer. Order custom trays before any demolition work begins.
Shower tray materials: how they compare on durability, feel, and cost
| Material | Weight | Warmth Underfoot | Impact Resistance | Scratch Resistance | Maintenance | Relative Cost |
|---|---|---|---|---|---|---|
| Acrylic/ABS | Light | Warm | Moderate | Moderate | Easy; chips can be repaired | Low |
| Stone resin/solid-surface | Heavy | Warm | High | High | Easy; non-porous surface | Medium–High |
| Ceramic/enamel steel | Very heavy | Cold | High (steel); brittle (ceramic) | High | Easy; chips harder to repair | Medium–High |
| Fiberglass | Very light | Warm | Low–Moderate | Low | Easy; surface fades over time | Low |
| Tileable/wet-room base | Varies | Depends on tile | High (with correct substrate) | High | Grout requires maintenance | Medium–High |
Acrylic is lightweight, budget-friendly, and naturally non-slip when wet. It is the most common choice for rental properties and standard retrofits. The main drawback is flex: a poorly supported acrylic tray can creak underfoot and is more prone to surface crazing over time. ABS reinforcement underneath reduces this significantly.
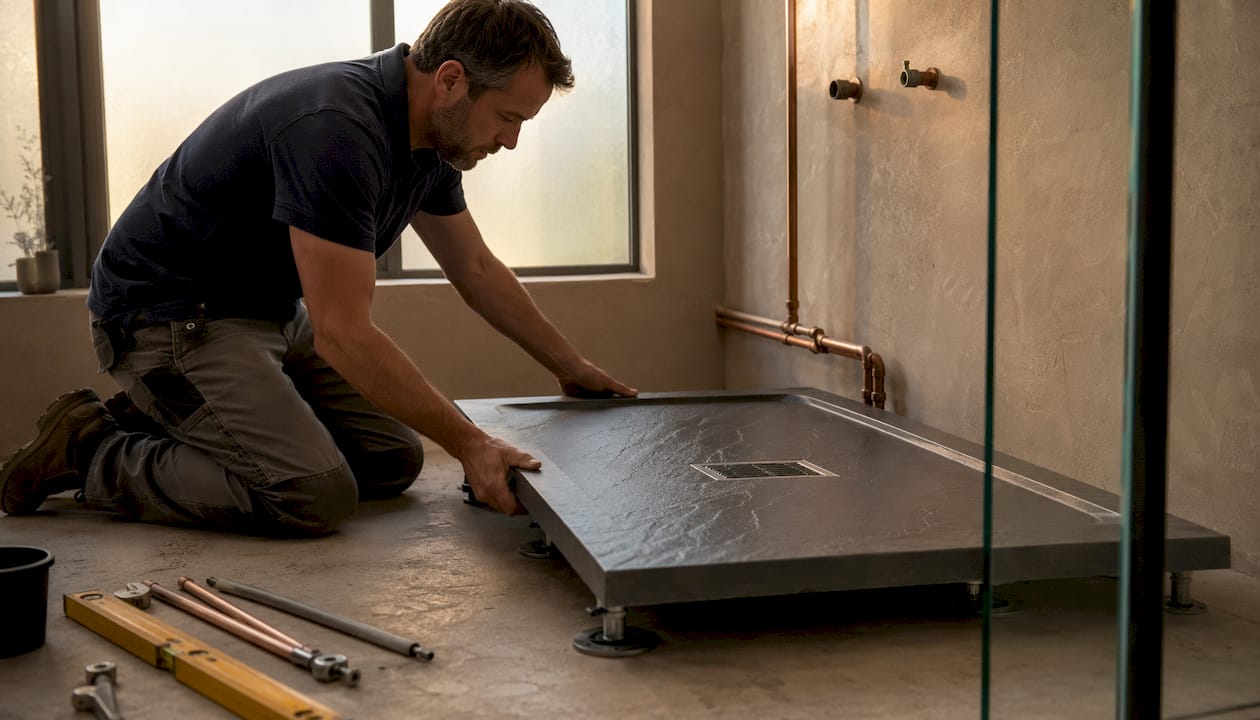
Stone resin combines mineral fillers with resin to produce a solid, dense tray that does not flex. The surface is non-porous, resists staining, and holds textured finishes well. Some manufacturers offer a hybrid construction: a mineral core with an acrylic cap, which is lighter than full stone resin while retaining the solid feel and allowing trim-to-fit capability. This type of construction suits slimline installations where weight is a concern.
Ceramic and enamel-coated steel trays are extremely durable and maintain a high-gloss finish for years. Steel enamel is cold underfoot unless the bathroom is well heated, and chips in the enamel coating are difficult to repair invisibly. Ceramic tile bases offer the most design flexibility but require correct waterproofing membranes and careful fall construction.
Pro Tip: Slate-effect and textured stone-resin trays provide inherent non-slip performance without adhesive grip strips, and they hold their texture through the life of the tray. This is the best option when you want a natural luxury look without sacrificing safety.
How tray profile and height affect accessibility and plumbing
Profile is the dimension most buyers underestimate until the plumber arrives.
- Low-profile/slimline trays sit at roughly 25–45 mm above the finished floor. They require the waste trap and pipework to fit within that shallow depth, which usually means the floor void must be deep enough to accommodate the trap below the subfloor. These trays give a modern, near-flush look.
- Standard/raised trays use riser kits (adjustable legs and a plinth panel) to lift the tray 100–200 mm or more above the floor. Raised trays are the practical retrofit solution when existing pipework or joist depth prevents a slimline installation. The plinth also provides easy access to the waste trap for maintenance.
- Level-access/wet-room trays sit flush to the finished floor with no step. They are designed to eliminate the threshold entirely, making them the right choice for wheelchair access and ADA-relevant bathroom designs. These trays require the floor to be built up or the subfloor to be cut down to accommodate the drain and fall.
For ADA compliance in U.S. residential bathrooms, the relevant standard is a curbless or low-threshold shower entry. A level-access tray with a maximum 0.5-inch threshold meets the general accessibility intent, though specific requirements vary by project type and local code. Consult your local building department for the applicable standard.
Upstands (the raised lip around the tray perimeter) vary by profile. Low-profile trays typically have a 10–15 mm upstand that tiles or wall panels seal against. Level-access trays often have no upstand at all, relying on a linear drain and a waterproofing membrane at the wall junction. Matching the upstand height to the enclosure frame profile is critical: a mismatch creates a gap that ordinary silicone cannot permanently seal.
Drain position, slope, and waterproofing: what to check before buying
Drain location is the single most consequential spec to verify before purchasing any tray.
Most standard trays place the drain at the center or offset toward one corner. The drain position on the tray must align with the existing waste outlet in the floor. If it does not, moving the drain requires opening the subfloor, repositioning the waste pipe, and in many U.S. jurisdictions, pulling a plumbing permit and scheduling an inspection. That work adds cost and time that a simple tray swap does not.
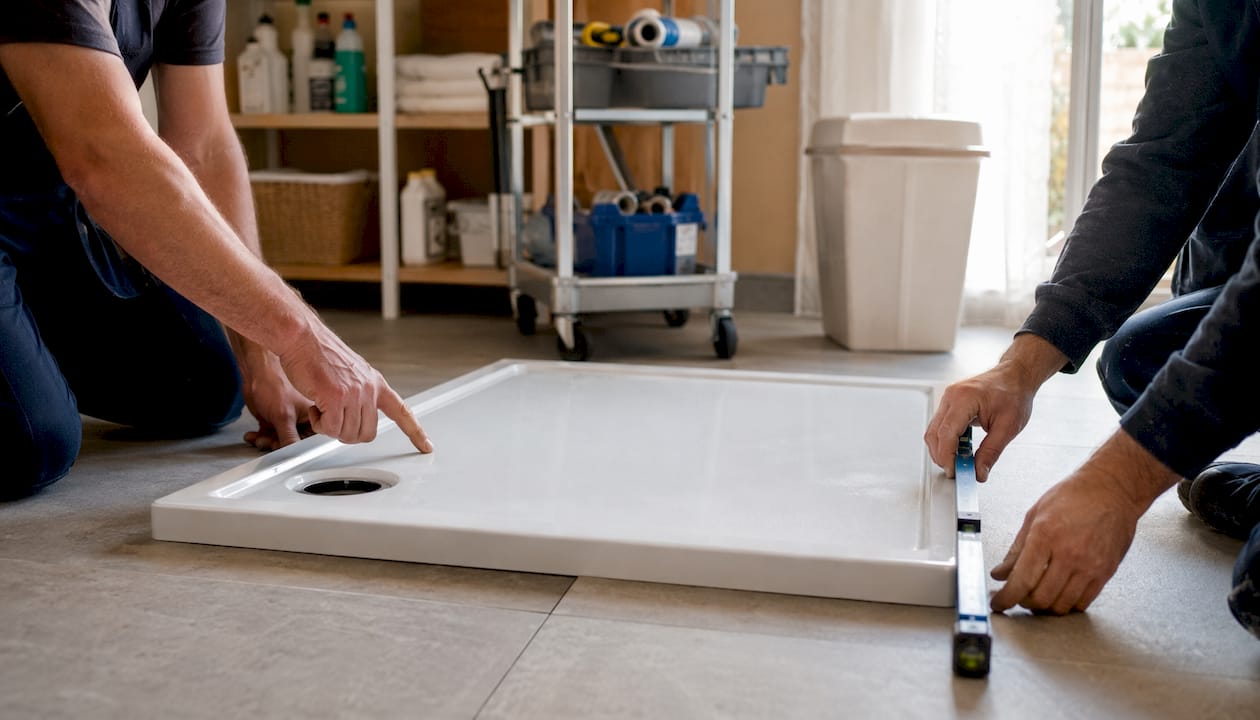
Every tray must have a minimum fall (slope) toward the drain to prevent standing water. Most preformed trays have this fall built in. Low-profile trays achieve the required gradient through an integrated molded fall, which is why the drain position on a slimline tray cannot be moved without replacing the tray entirely. For tileable bases and wet-room trays, the fall must be constructed in the mortar bed or screed, which requires a skilled installer.
Sealing at the tray-to-wall junction is where most shower leaks originate. The correct sequence is: tray installed and leveled, wall tiles or panels brought down to within 2–3 mm of the tray surface, then a flexible silicone bead applied at the junction. Never grout this joint. Silicone allows for the slight movement between tray and wall that occurs with temperature changes and load.
Pro Tip: Before ordering, check the waste trap depth specification on the tray’s technical data sheet and compare it to the available floor void depth. This single step prevents the most common and costly installation surprise.
Installation basics, timeline, and routine maintenance
Installation steps and trades involved
- Floor preparation. The subfloor must be level, solid, and dry. Any flex in the subfloor will cause a stone-resin or ceramic tray to crack over time. Acrylic trays are more forgiving but still benefit from a fully supported base.
- Waste connection. The waste outlet on the tray must align with the floor drain. Connect the trap before setting the tray permanently. Confirm trap depth fits within the available void.
- Leveling. For raised trays, adjust riser legs until the tray is level in both directions. For low-profile trays, use a mortar bed or proprietary tray former to achieve a fully supported, level installation.
- Sealing. Apply silicone at all tray-to-wall junctions after tiling is complete. Use a sanitary-grade silicone rated for wet areas.
A standard off-the-shelf acrylic tray replacement typically takes one day for a plumber and, if retiling is needed, an additional one to two days for a tiler. A full wet-room build with a tileable base involves waterproofing, screed, tiling, and drain installation, which can take three to five days across multiple trades. For plumbing infrastructure considerations, including joist depth and waste routing, review the technical requirements before demolition.
Maintenance checklist
- Acrylic: Clean with a non-abrasive liquid cleaner. Inspect the silicone seal every six to twelve months. Small chips can be repaired with an acrylic repair kit.
- Stone resin: Wipe down after use to prevent soap scum buildup. The non-porous surface resists staining. Chips are harder to repair invisibly than on acrylic.
- Ceramic/enamel steel: Clean with a mild bathroom cleaner. Enamel chips require professional repair or touch-up enamel paint to prevent rust on steel trays.
- Tileable/wet-room: Re-grout grout lines as needed. Inspect the waterproofing membrane at the drain and wall junctions annually.
Replacing an off-the-shelf acrylic tray is straightforward: disconnect the waste, lift the tray, fit the new one. A heavy stone-resin or ceramic tray requires two people and careful handling to avoid cracking the tray or damaging the floor.
How to choose the right shower tray: a decision matrix
| Priority | Recommended Shape | Recommended Material | Recommended Profile |
|---|---|---|---|
| Accessibility / no step | Rectangular or walk-in | Stone resin or solid-surface | Level-access / flush |
| Small bathroom / corner space | Quadrant or square | Acrylic or stone resin | Low-profile or slimline |
| Bath-to-shower conversion | Rectangular (bath-width) | Acrylic or stone resin | Raised with riser kit |
| Luxury renovation | Large rectangular or walk-in | Stone resin, solid-surface, or natural stone | Low-profile or level-access |
| High-traffic rental | Square or rectangular | Acrylic | Raised (easy maintenance access) |
| Retrofit with limited floor void | Any standard shape | Acrylic | Raised with riser kit |
Questions to ask your supplier or installer:
- What is the waste trap depth, and does it fit within my available floor void?
- Does the tray upstand height match my planned enclosure frame profile?
- Is the drain position fixed, or can it be specified at order?
- What warranty covers surface damage vs. structural defects?
- Are riser kits and matching waste traps available for this tray model?
Red flags when shopping: A tray listed without a waste trap depth specification is incomplete data. Mismatched upstand profiles between tray and enclosure are a long-term leak risk that silicone alone will not permanently resolve. Buying the tray and enclosure as a system-matched set eliminates both problems.
Ceramic vs. stone resin: which material actually holds up?
Stone resin is the better all-round choice for most U.S. family bathrooms. It combines impact resistance, a warm feel underfoot, a non-porous surface, and the ability to carry textured finishes that provide inherent slip resistance. Ceramic and porcelain tile bases offer unmatched design flexibility and a hard, glossy surface, but they are heavier, more brittle under point impact, and more difficult to repair if cracked. For high-traffic family use, stone resin’s durability and repairability give it a clear practical advantage. For a luxury renovation where the visual design is the priority and installation quality is high, a ceramic or natural stone base delivers a finish that stone resin cannot fully replicate.
For U.S. family homes, stone resin or a solid-surface tray is the most practical specification: durable, warm, low-maintenance, and available in sizes that cover most standard bathroom layouts. For high-traffic rental properties, an acrylic tray is the cost-effective choice because it is easy to replace and widely available in standard sizes. For a luxury renovation, a large-format ceramic tile base or natural stone floor, installed with correct waterproofing, delivers the premium finish that justifies the higher installation cost and complexity.
The weight difference is worth noting. A full stone-resin tray can weigh significantly more than an acrylic equivalent of the same size. Confirm the floor structure can support the load, particularly in upper-floor bathrooms with timber joists. This is a point where plumbing regulations and local building codes may intersect with structural requirements.
Key Takeaways
Matching tray profile to available floor void depth is the single most important technical decision in any shower tray project.
| Point | Details |
|---|---|
| Shape follows space | Quadrant for corners, rectangular for maximum area, square for compact symmetrical layouts. |
| Material determines durability | Stone resin outperforms acrylic on impact resistance and surface longevity for family use. |
| Profile depends on plumbing | Low-profile requires adequate floor void; raised trays with riser kits solve most retrofit constraints. |
| Drain position is fixed early | Verify existing waste location against tray specs before purchase to avoid subfloor work. |
| Santehnikasveikals for sourcing | Santehnikasveikals stocks shower trays, riser kits, waste traps, and compatible enclosures for complete bathroom builds. |
The detail most buyers overlook
Most renovation guides focus on shape and finish. The buyers who run into problems are almost always the ones who chose a tray without checking two numbers first: the waste trap depth and the drain center-to-wall measurement.
A tray that looks right in a product photo can require significant subfloor work if the drain position does not align, or if the trap is too deep for the available floor void. Raised trays with riser kits solve the second problem cleanly, but they add height to the finished floor, which affects the enclosure door clearance and the threshold step. These are not difficult problems to solve, but they require the measurements before the order, not after.
The other mistake is buying the tray and enclosure from different sources without confirming upstand compatibility. A 10 mm upstand on the tray and a 15 mm channel on the enclosure frame will not seal correctly regardless of how much silicone is applied. Santehnikasveikals carries matched tray and enclosure combinations, along with riser kits, waste traps, and seals, so the compatibility check is built into the selection process rather than left to the buyer to figure out independently.
Santehnikasveikals: trays, enclosures, and accessories in one place
Choosing the right shower base is straightforward when the product range covers all the variables. Santehnikasveikals stocks shower trays across the full range of shapes, materials, and profiles, alongside compatible enclosures, riser kits, waste traps, and seals.
Before ordering, confirm your drain center-to-wall measurement and available floor void depth. The product catalog includes technical data sheets with waste trap depth specifications for each tray model. For curved and quadrant options, the RAVAK Ronda 90 is one example of a half-round tray with published dimensional specs. For a complete bathroom build, the Santehnikasveikals store covers trays, enclosures, faucets, and installation accessories with delivery available.
Contact customer service with your floor measurements and drain position photos for product compatibility guidance before placing an order.
Useful technical sources
The following sources provide detailed specifications, buying guidance, and installation references for shower trays:
- Shower Tray Buying Guide, Toolstation — profile height definitions and accessibility guidance
- Types of Shower Tray, DIY Doctor — shape and size reference with installation type overview
- How to Choose the Right Shower Tray, Drench — drain position, waste trap depth, and material selection
- Shower Tray Types and Materials, Sanctuary Bathrooms — wet-room and tileable base waterproofing requirements
- 9 Best Materials for Your Shower Tray, House Digest — material comparison including fiberglass, cast iron, and natural stone
- Shower Tray Types, Mira Showers — shape and size reference with raised vs. flat profile guidance
Always check the waste trap depth and trap size on the technical product page before ordering. These specifications are not always visible in the main product listing and are the most common source of installation surprises.
Palikite komentarą